 by Fiona on Jan. 29, 2016 | NO COMMENT
Just upgraded to an iPhone 6s and want to transfer some photos from Mac to iPhone? Try this tutorial to learn 3 methods.

Don't have PrimoPhoto? Download it now prior to reading this guide and it will save you quite a lot of time. Click Here to Free Download
"How could I transfer photos from a Mac to an iPhone 6s Plus? I don't want to use iCloud Photo Library or Photo Stream. I think there is some way to do it using iTunes. Or any other options?" A user questioned in AskDifferent."
When it comes to transferring pictures from Mac to iPhone 6s, the first option bumps into your mind probably be iTunes – it allows you to sync photos from Mac to iPhone. But there are also some obvious drawbacks you need to know:
1). The interface of iTunes is kind of confusing especially for novice users.
2). The previous photos on your iPhone 6s that you synced with iTunes will be wiped.
3). iTunes is a single-way transfer so it is impossible to transfer photos from your iPhone 6s back to Mac.
In this guide, we describe two common ways to transfer photos to iPhone 6s from Mac: with iTunes or AirDrop, and also offer you a third option to remedy those weaknesses of the mentioned ways.
iTunes is a little bit confusing for Apple newbies, and you should know that the previous pictures in Photo Library on your iPhone 6s will be wiped every time you sync photos with iTunes.
Step 1.On your Mac, create a folder with the photos you want to transfer to your iPhone 6s.
Step 2. Open iTunes and connect with your iPhone. Click the Device button.
Step 3. Select Photos, and check Sync Photos option. Then select Choose folder…, and then select the folder you just created. Click Apply.
To transfer single photo from Mac to your iPhone 6s or iPhoen 6s Plus, AirDrop is the simplest way to go. Your Mac needs to be OS X Yosemite and later.
Step 1. Enable AirDrop on your iPhone 6s: Swipe up from the bottom on the home screen > Tap AirDrop > Choose Everyone.
Step 2. Open Finder on your Mac, and select AirDrop. Enable AirDrop by turning on Wi-Fi and Bluetooth.
Step 3. The AirDrop window will show the nearby AirDrop users, and you should see your iPhone 6s. Drag one or more photos to the recipient's image in the window, then click Send.

How to Transfer Photos from Mac to iPhone 6s via AirDrop
With PrimoPhoto, everything is in the palm of your hand: transfer single or multiple photos from Mac to your iPhone 6s without wiping data, and vice versa. It is a user friendly and powerful iPhone photo manager, and you can:
Designed to fit effortlessly into your iPhone photo management
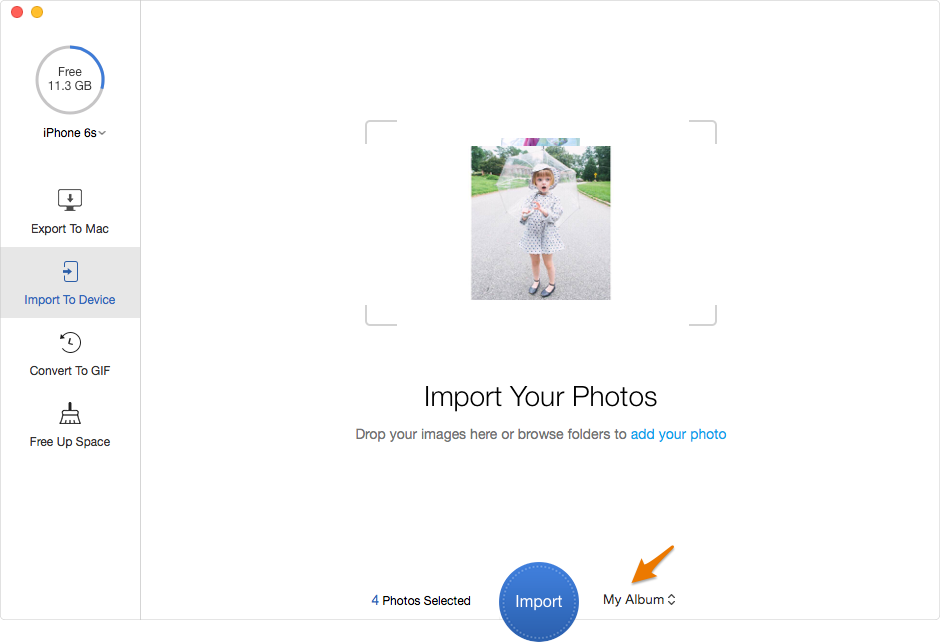
Download NowStep 1. Run PrimoPhoto on your Mac, and connect with your iPhone 6s or iPhone 6s Plus.
Step 2. In the Import to Device section, drag the photos from your Mac to PrimoPhoto.
Step 3. Then import the photos to your iPhone album.
Transfer Photos from Mac to iPhone 6s via PrimoPhoto


Fiona Wang Member of @PrimoSync team as well as an Apple fan, love to help more users solve various types of Apple related issues by writing iOS-how-to tutorials.
Get Up-to-the-minute iPhone Tips & Enjoy Awesome Deals.
![]()
![]()
Design Simple and Beautiful Software
with Passion & Love